Your POS is screen is made up of buttons. These buttons can be departments, products, or menus.
To add buttons to the POS touchscreen rather it be Departments, Products, Menu and also removing unused buttons. First, go to app.petrooutlet.com then Store Management.
Note: this can only be done on the computer

Next, go to Registers then configure.

Scroll down until you see the different options: Product, Dep., Menu, and Unused.
Once you select the one you have to click on the option and drag it to where you want it.

Then go where it says Select a Dept. pick the department you want and it will also change the label name to that Department you selected as well.

This works the same for Products

As well as the menu option

If you need to create a menu, go see the article called 'How To Create Menus and How To Chain Them'.
And the unused option

Once you put the buttons you want on the POS Touchscreen, scroll down to the bottom until you see Save Changes. Click on Save Changes. Now your buttons are on the POS Touchscreen

(imported from support.petrooutlet.com, written by Mahdi Hussein)
Other Configurations
There are several other options you have for your POS. Here is what each option is:
Receipt Configuration
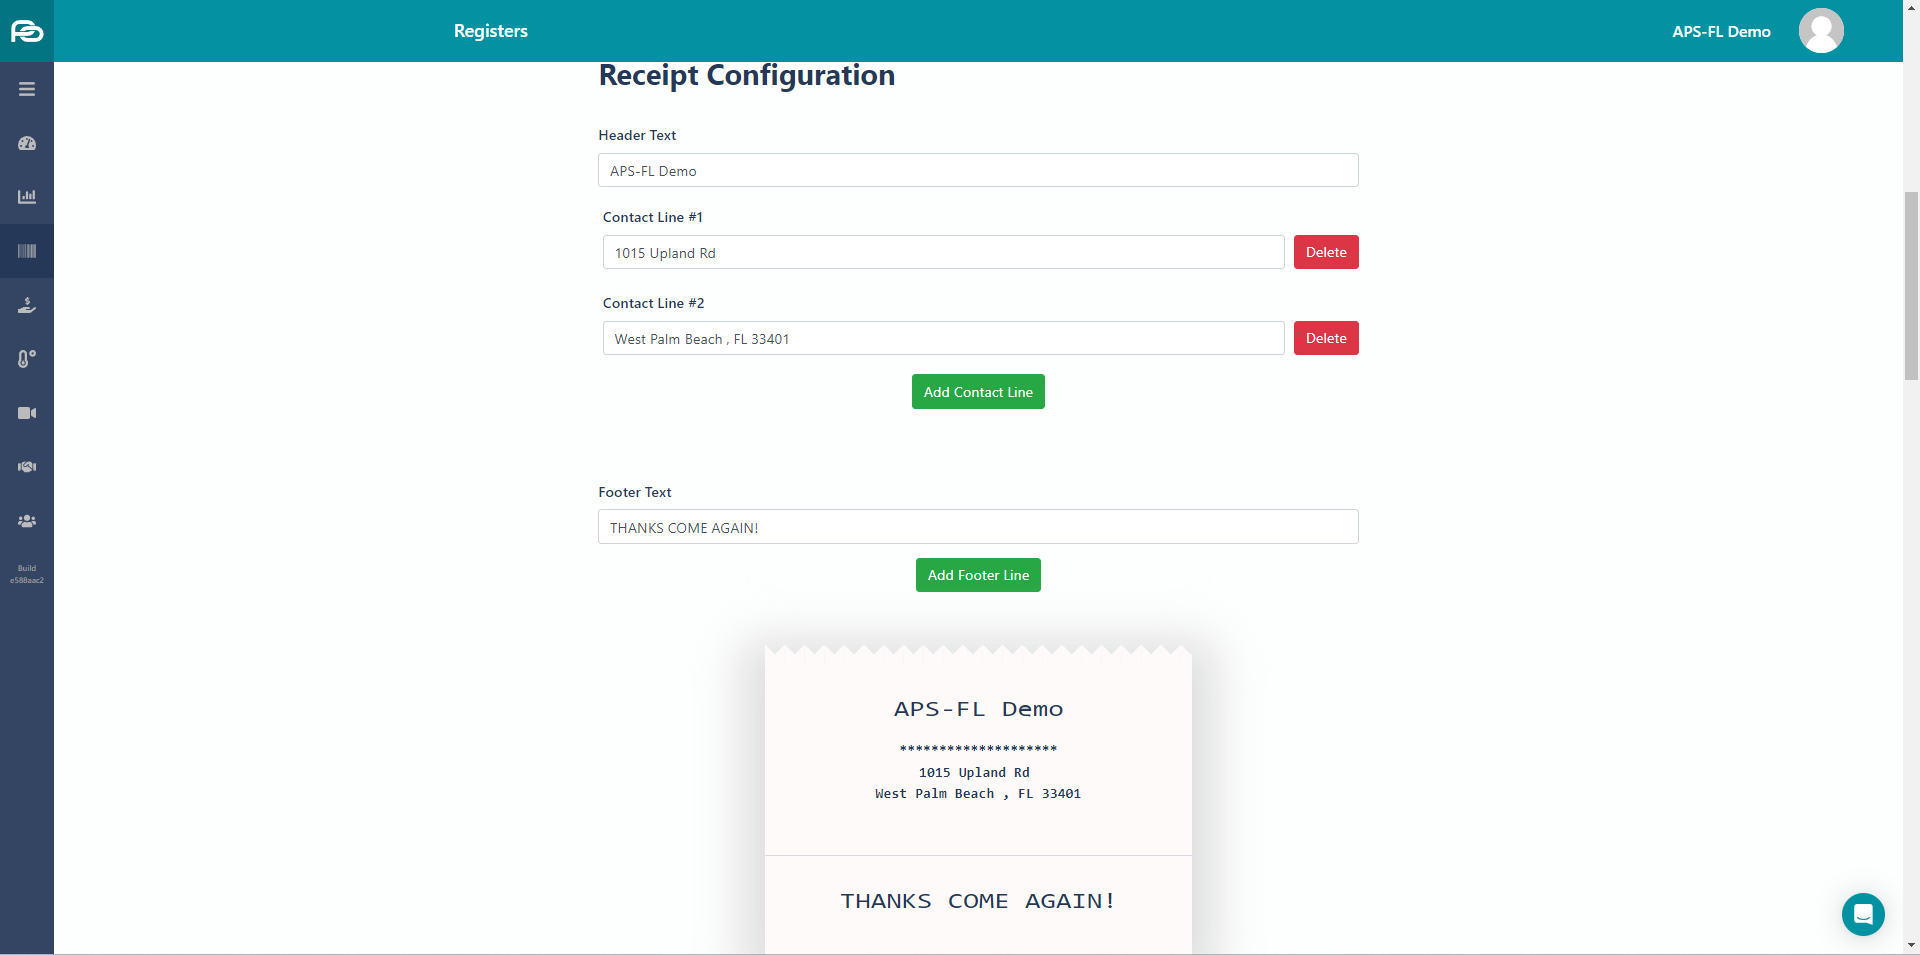
- Header Text - Usually what your store's name is
- Contact Line 1 - Your Street Address
- Contact Line 2 - City, State, ZIP
- Footer Text - What you want the bottom of the receipt to say
- This is all fully customizable, so you can do whatever fits your store's needs
Sales Configuration
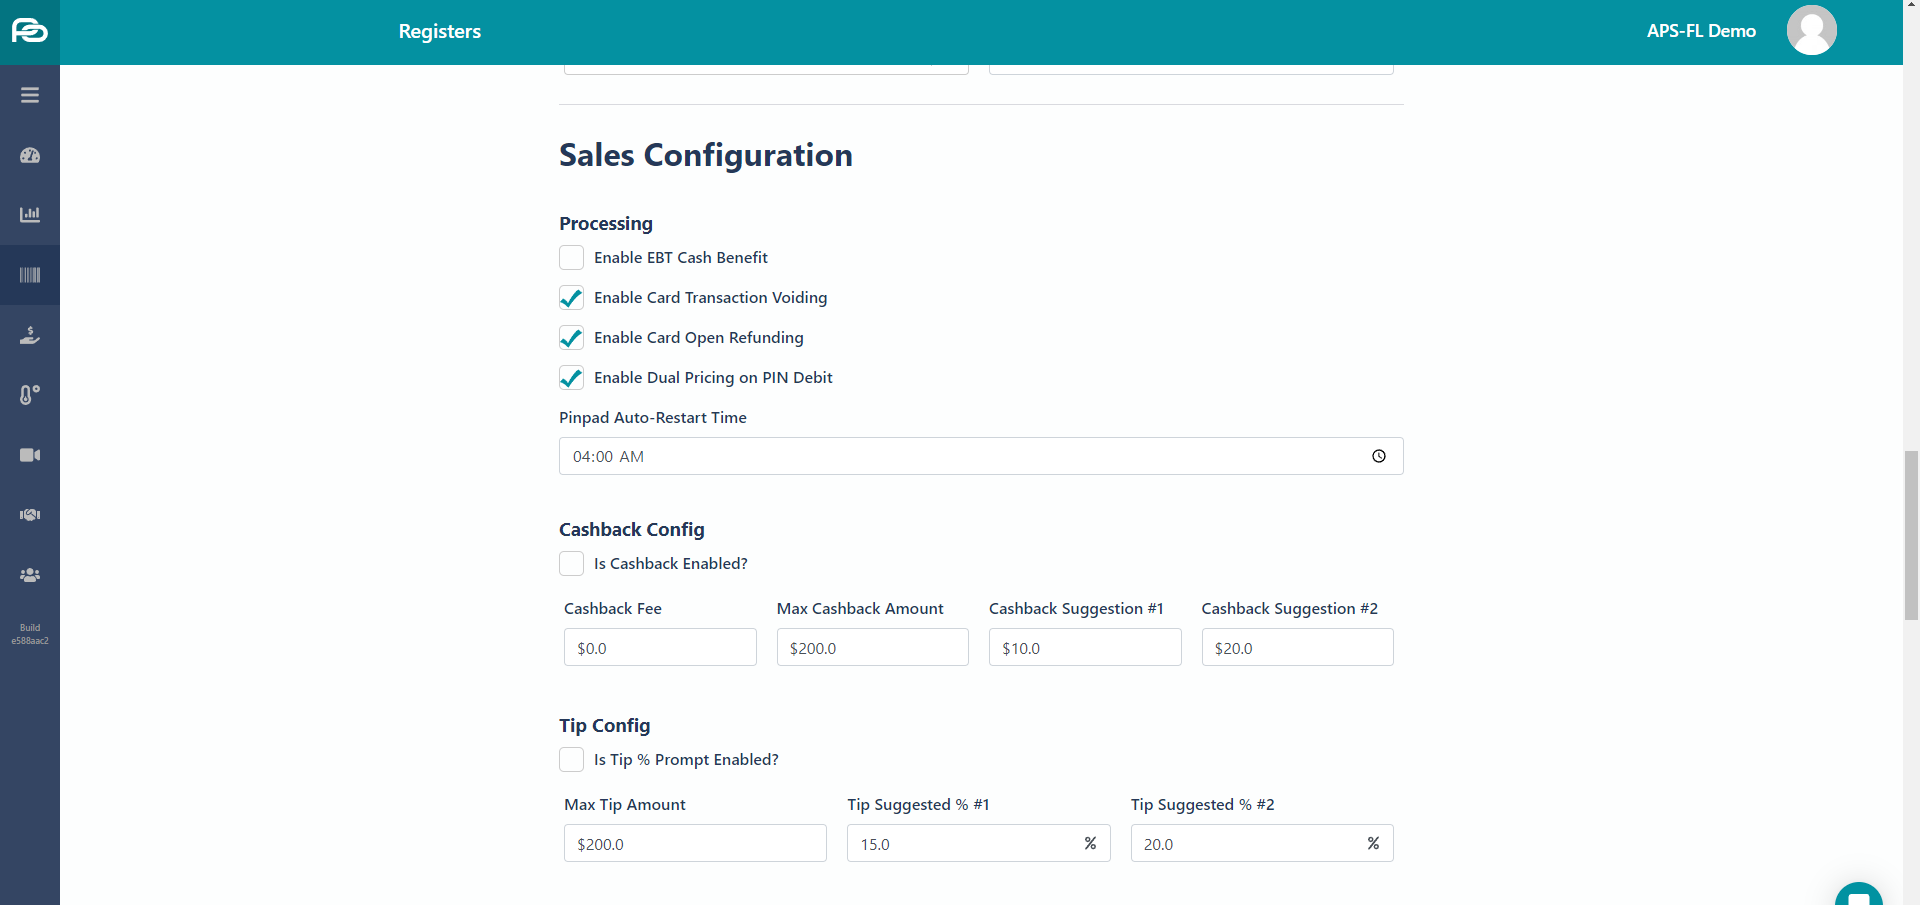
- Don't worry about the processing options, this will be done for you prior to installation
- You can enable cashback - enter a fee, your maximum payout, and two suggestions
- You can enable tip prompting - you can enter a max tip amount, as well 2 tip % suggestions
Printing Options
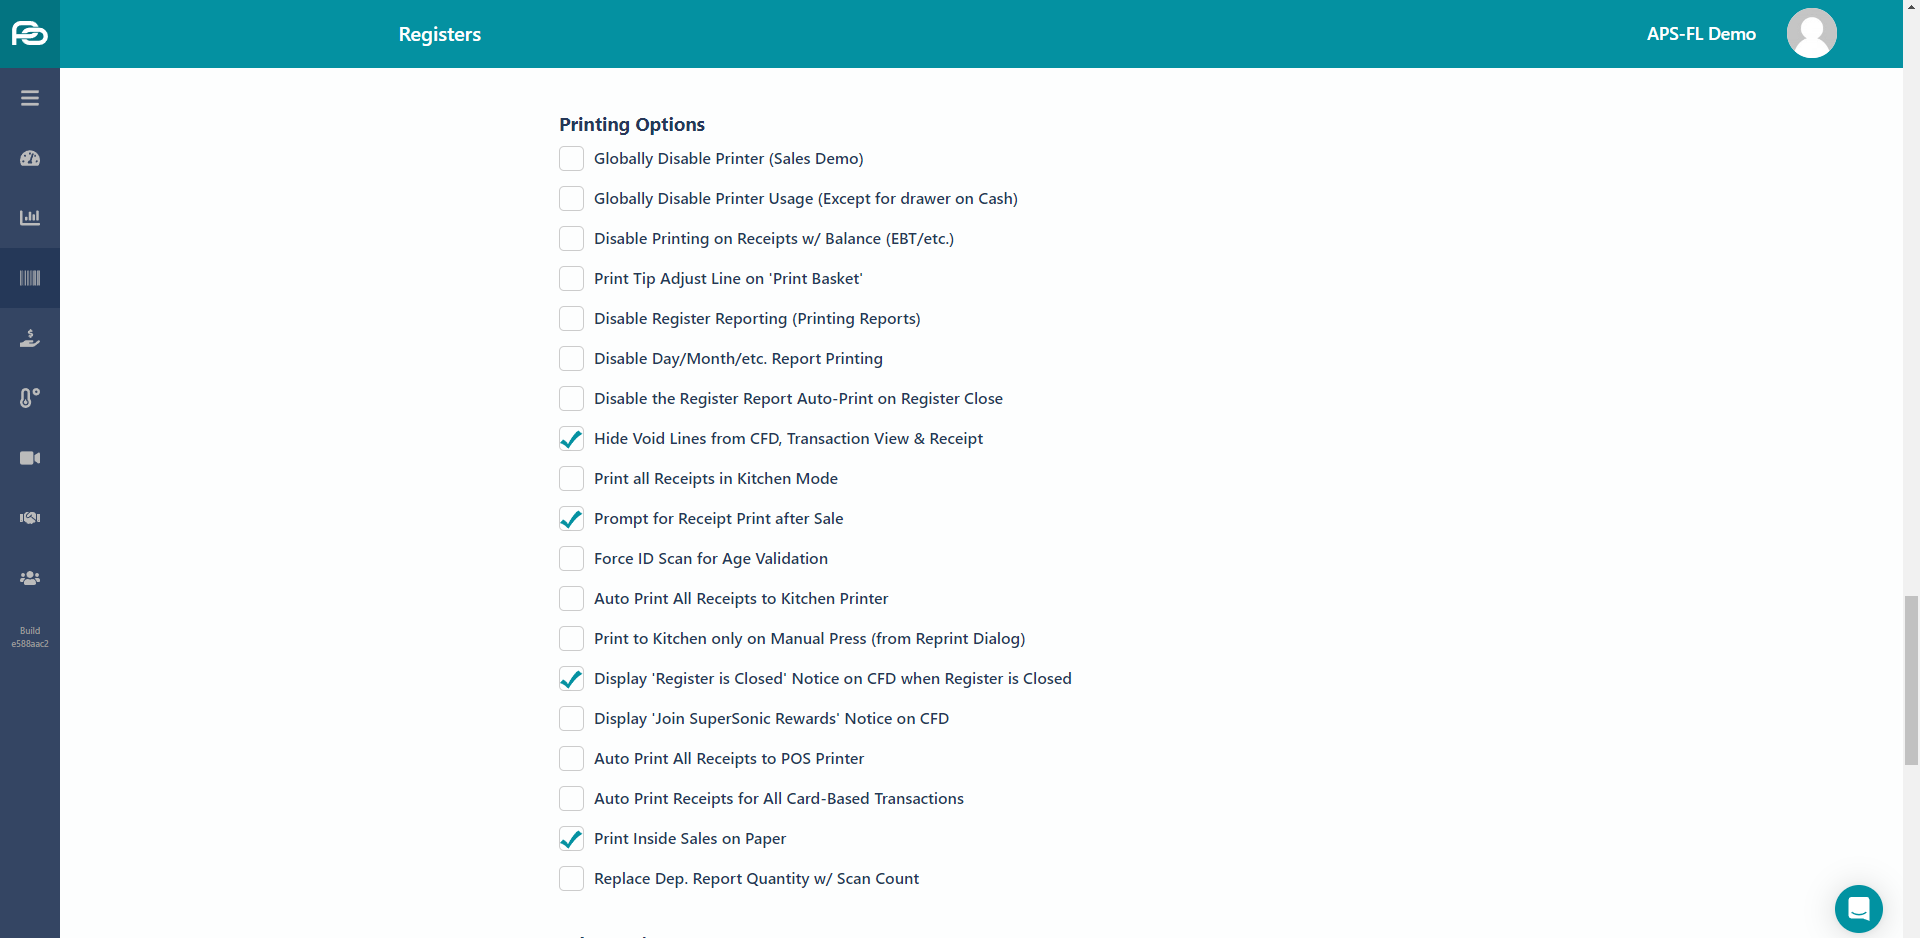
Disable Register Reporting (Printing Reports) - Disables that specific register from printing reports
Disable Day/Month/etc. Report Printing - Disables that specific register from printing Day/Month/etc. reports
Disable the Register Report Auto-Print on Register Close - Disables that specific register from automatically printing a register report on closing.
Hide Void Lines from CFD, Transaction View & Receipt - If this option is checked, an item that was voided from the basket will disappear. If this is
unchecked, the voided item will remain visible on the screen with a red line through it.
- Print all receipts in Kitchen Mode - All receipts will automatically additionally print to Kitchen
- Prompt for Receipt Print after Sale - After every sale, the POS will open a dialog box asking to print receipt.
- Auto Print all Receipts to kitchen - Checking this box will auto print any finalized sale to the kitchen printer.
- Auto Print All Receipts to POS Printer - Checking this box will auto print every finalized sale to the POS Printer
- Auto Print Receipts for All Card-Based Transactions - Checking this box will auto print the receipt after any Credit, Debit or EBT Sale.
- Print Inside Sales on Paper - Prints a reports of inside sales

Sales Options
- Enable USB Integration for the Tor-Rey (Small) scale - Check this box if using an integrated scale
- Automatically Read Scale Information on Fractional Product – Requires the scale flag - When an item is placed on the scale, the dialog box will open automatically.
- Shift Weighted Barcodes for (Greater than) $100 Embedded Amounts - For weighted items where the barcode has a price component over $99.99. The merchant needs to shift the barcode price-embedded section. This selection takes away one PLU digit and gives it to the Price section.
- Enable Cashier Logins - Used to create multiple users on the POS with individual PIN numbers to open the register.
- Calculate Drawer Balance - Checking this box will prompt for a cash balance upon opening and closing of the register.
- Reverse the Number Order on the Number Pad
- Cash Button Amount – This allows the owner to configure the Cash Payment amounts on the main screen. Standard is 5.00, 10.00 and 20.00 because those are the most common bills used. If the owner wishes, the values may be changed.
o Button #1 - $5.00
o Button #2 - $10.00
o Button #3 - $20.00 - Register Auto Close Time (Do not use for 24-hour stores, must stay closed for 10 minutes)

Register Management
- Enable Basic Product/Price Editing - Allows changes to products and prices from the Price Check button
- Enable Linked SKUs (CRV) on Product Editor - This needs to be enabled for states that have CRV Bottle Deposits
- Enable Storage Only Version of ‘Not Found SKUs’ - When an item is scanned that is not saved in the price book, this option only allows the cashier to enter a one-time price for the item, but it will not save. At the end of the day the
owner/manager can run a report of “Not Found SKUs’” and see what products were scanned and what price the cashiers entered. They can then save those items to the pricebook with the correct price. - Enable Product Deletion - This allows the cashier to delete products from the POS. If this is not checked, deletion ofproducts is only available through the back office.
- Enable Instant Creation Version of ‘Not Found SKUs’ - This is the opposite of Storage Only Version of Not Found SKUs’ This will save the product in
the price book with whatever price the cashier enters from the POS. This can be dangerous if the cashier enters in the wrong price, the store could lose money on that product every time it is sold.
Make sure to always save your changes when you are finished!